Here's How To Nail The Angel Wing Eyeliner Look
Thanks to having masks as part of our daily outfits these past few years, sporting graphic eyeliner no longer feels like something you reserve for a night out on town. The classic winged liner, specifically, has remained a popular favorite despite the many inventive eye trends sprouting on TikTok, thanks to the instant shot of drama and glamor it gives. An added benefit is its versatility as a base for even bolder and more creative looks.
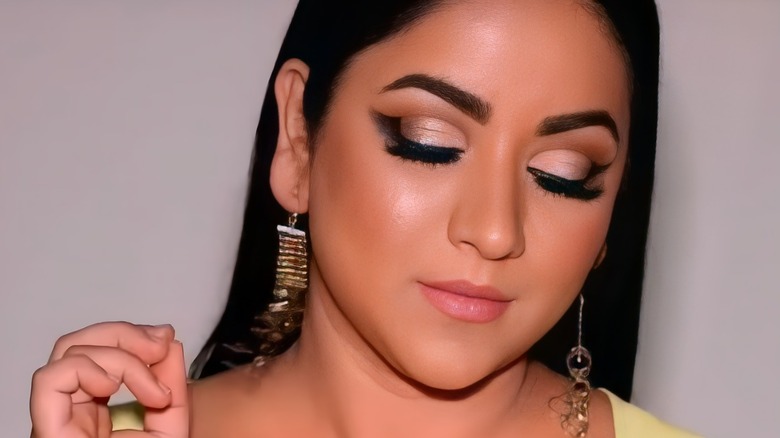
One example is the dreamy angel wing eyeliner. Though it still calls for the classic winged look's precision, its softer lines and blurred edges mimic the feathery outline of angel wings to create a more ethereal, yet striking appeal. Throw in the use of different colored liners, and you've got yourself a dramatic eye makeup that feels not of this earth. In fact, many of the angel wing eyeliner looks you encounter on TikTok are done using white or pearlescent eyeliner, the better to create that heavenly aesthetic. However, you can definitely ease into this trend with the classic black liner and a few simpler flourishes.
If you want to master winging this look, practice first with a stacked angel wing eyeliner a la Lori Harvey. This look highlights both the upper and lower lash lines, extending into separate wings that curve slightly upward to create a delicate, feathered effect. Once you have leveled up your eyeliner skills, go bolder with graphic triangles and brush strokes that a full-on angel wing eyeliner look calls for.
Prep the eyelids for a perfect base
No matter what variation of the angel wing eyeliner you want to sport, creating the perfect base is the most important step. Makeup artist Eddie Duyos advised on Byrdie to apply primer on the eyelids to help keep the liner looking clean and sharp all day without smudging. You can also use concealer, softly blending then setting it with translucent powder. Shape and fill in your brows too so they frame your eyes well.
Once you've primed, apply eyeshadow that's close to your skin tone on your lid with a flat or angled brush. To create a subtle gradient, use another, slightly darker eyeshadow from your crease down to your upper lash line. Blend the color transition smoothly with a blending brush.
What's great about the angel wing eyeliner look — or winged eyeliner, in general — is that even those with hooded eyelids can pull it off. Beauty vlogger Smitha Deepak demonstrated in her YouTube tutorial how creating a "second" crease above the natural one helps make the lines for the angel wing more visible. Do this by looking straight at the mirror and, with a small blending brush, applying eyeshadow that is slightly darker than your skin tone to mark where the new crease would be. Deepen it with an even darker hue for added dimension. Next, cover your eyelid with concealer up to where you've created a higher crease. Diffuse and blend it with the pad of your ring finger for a more natural effect.
Outline first, then fill in your angel wing eyeliner
Before drawing with eyeliner, makeup artist Jonet Williamson recommended creating an outline with eyeshadow first (per Makeup.com). This lowers the risk of having to redo everything or draw bigger and bigger strokes to cover up mistakes. This step also applies to any angel wing look you're going for, including pastel or all-white ones.
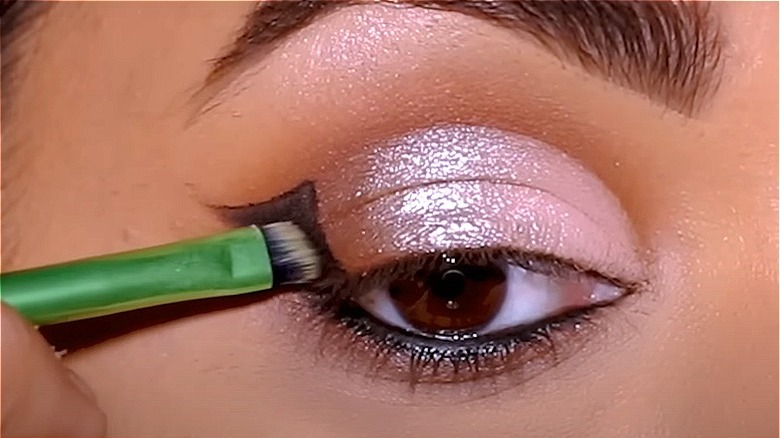
With an angled brush, apply eyeshadow to "extend" your lower lash line up to slightly above your crease (or your new crease, if you created one). At the tip, draw a short curved line to connect it with the end of your crease. Complete the triangle of your wing with a line sloping down to the middle of the upper lash line. Use black gel liner to fill the triangle in then layer it with black eyeshadow for uniform opacity, just like Deepak did in her tutorial. Smoke out the bottom line of the wing with a Q-tip dipped in black shadow to create a feathered effect. Keep the rest of the lines wing clean and sharp. Finish by lining the top lash line, then curling your lashes and coating them with mascara. A pop of highlight on the inner corner of the eye also creates a brightening effect.
For amped-up glamor, before drawing your wing, apply iridescent shadow from mid-lid to the outer edge of your eye. Blend it with the shades you used to create the crease. Applying eyeliner to your lower lash line also adds dramatic flair.
Play around with pearlescent eyeliner
Once you've mastered drawing angel wings, try creating bigger shapes and more elaborate lines using white or pastel hues. Williamson's tip, shared on Makeup.com, is to "[use] a lighter iridescent or white eyeshadow to sketch out where you want to place your eyeliner." She also advised looking straight ahead when making your angel wing outline so it avoids your natural crease. Even if you are into creating even more experimental looks, such as TikToker @sourandnasty who drew wings under the outer corners of her eyes, a straight gaze helps you gauge the symmetry of your lines. Keep checking for balance as you draw and fill them in.
Similar to last year's trendy fairy wing eyeliner (as reported by Pop Sugar), the delicate yet playful lines that you draw in white or pastel are easy to play up with some sparkle. Add to the wings' ethereal appeal with metallic eyeshadow, glitter, and rhinestones.
With precision key to pulling off the angel wing eyeliner look, make sure you have the proper tools. An extra-fine eyeliner brush, preferably one that works well with either cream, gel, or liquid liner, can achieve the clean, fine lines any winged liner look requires. Beginners can also benefit from using an eyeliner stamp to create instant symmetrical wings. In case of mistakes, a makeup eraser pen can do spot cleaning and keep the rest of your makeup intact. Finally, the classic Q-tip is always handy to keep around for quick makeup fixes.

